In July 2018, we set up our class A Automatic Identification System (AIS) transceiver. AIS has Class A and Class B systems. Generally, Class A is used by ships. Class B is used by recreational boats. Click here for more info on the system.
Fir requires a Class A AIS transceiver. We have yet to make our global decision on a single marine electronics provider for the base system. The AIS transceiver is part of our secondary navigation system. That said, not all of the major manufacturers offer Class A systems.
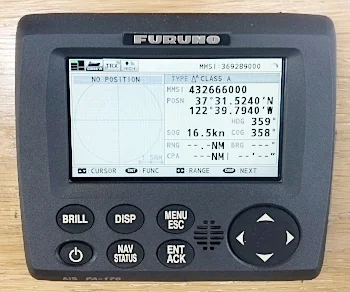
Ultimately, we chose the Furuno FA-170.
Joe installs our Shakespeare 6396-AIS-R to the top of the A-Frame mast. This is a 4 foot, top of the line (Phase III) antenna with 3db gain.
The Furuno 170A has three components: 1) the user display, 2) the GPS antenna, and 3) the main box where all the action takes place.
The "head" or display of the Furuno system is mounted to the bulkhead behind the chart table. Historically this is where Fir has mounted the communication systems.
The Furuno 170A has an independent GPS antenna. We chose to mount the antenna between the A-Frame supports and just above the solar panels. In the (hopefully) unlikely event that we encounter a bridge or storm that strips off our primary GPS antenna, this antenna should survive as backup. Also worth noting is that we ran the wiring outside the mast bundle which adds to the independence of this system.
The "main box" is mounted in the base of the chart table.
Our starter system is not complicated. We are only trying to connect the three components and have them function locally (the Furuno 170A is capable of extremely complicated network systems).. The connection between the antenna and the main box is simple. The kit includes a wire with appropriate ends that plug into the base of the antenna along with the base of the main box.
The wiring between the head and the main box seems overly complex. Furuno provides plenty of cable to connect the head and main box but, this is raw cable and you have to strip the ends before placing them into a connector. The head needs a special tool to connect the wires to the terminal. Therefore, the body of the unit must be disassembled. The main box requires another special tool to connect the wires to the terminal. Meanwhile, the wire sequence from the head does not match the wire sequence from the main box. There is a schematic in the manual so we figured it out but, it would be so much easier to have a dedicated connection.
Upon powering up the unit, you are asked for a password. Unfortunately, no password is provided in the box or the manual. As it turns out, the system is supposed to be installed by a technician licensed by Furuno that would have the code. Luckily, Furuno agreed to help given that we are a recreational vessel. The unlock key sequence is: NAV/STATUS, DISP, BRILL, BRILL, BRILL.
After unlocking the device, we followed the instructions to enter our radio information (the MMSI and Call Sign from our FCC license). We then entered basic information about our boat: name, length, beam, draft, and antenna location (relative to the boat). Finally, we entered our journey information to say that we are at anchor. We felt that this last bit of information was necessary since we are within a mile of the shipping lane and Fir's orientation is perpendicular to the lane.
Upon powering up, the Furuno went through several sequences. After a few seconds, our GPS location stabilized and the system began populating a list of AIS contacts in the area. The initial list only displayed MMSI numbers. After a few minutes, list details were filled out with boat names etc. The system started generating alerts. And, when Joe went home at the end of the day he confirmed that Fir showed up on his Class B system which is several miles away. So, the simple system is working well.
The next step will be to connect one of the COM ports of the main box to our NEMO using an NMEA0183 connection. This should allow us to display AIS target on our Coastal Explorer charts. Check back to see how this goes.
#yachts, #marine, #marineelectronics, #furuno, #marinenavigation


